:::WORK IN PROGRESS:::
Introduction[]
Welcome to Part 2 of this tutorial series teaching you how to use blender. I highly recommend that you read through the entirety of the tutorial from start to finish so that you can pick up details that appear in every section.
Last time we installed blender, learned the numerous view controls, how to save a blender file and navigate the file browser, and then finally how to import a .dnm or .srf file into blender.
You can check out Part 1 here: Learn to use Blender - Part 1
Selecting the Right Airplane to Start[]
When first starting to learn how to use blender, we are going to begin with painting an aircraft. Ideally we would start with a blank version of the aircraft if one exists, but many times there are paint schemes cut into the model. Our first challenge will be to remove this paint scheme so we can paint our aircraft. This is going to require us to learn some fairly advanced techniques, but with practice this will become easier very quickly.
When first starting we want something low detail so we don't get boggled down in all the specific details that come with higher quality models. I highly recommend that you use something from OWL's airliner pack, which can be downloaded here:
http://free-kr.t-com.hr/owl/owls_airliners.zip
These aircraft are not the lowest detail out there, but offer a good starting point to build your skills.
Importing an Airplane[]
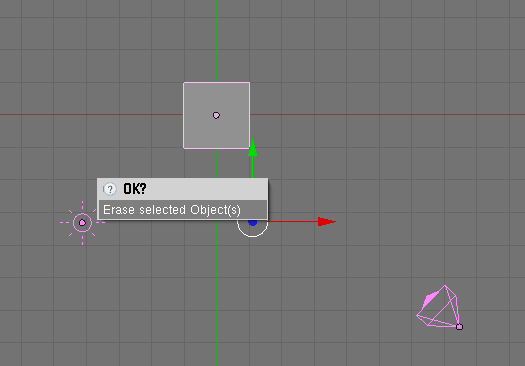
Object Mode Delete Menu
To begin, we must delete everything from the startup screen. I typically press "a" to select everything. To delete an object, press "x". This pops up a menu. If we do nothing and move our mouse away from the menu, or press escape, then nothing will happen. To complete the delete action, we must click on "Erase Selected Object(s)".

Owl's Airbus 345
Now that you have a blank blender file, we can begin! Import the airplane you chose from OWL's pack. I chose the Airbus A345. It is large enough to give us some wiggle room with certain features.
View Modes[]
If you have imported your aircraft and it did not look like the image above, you are probably not in the right view mode. The view modes can be controlled by the dropdown menu next to the "Object Mode" drop-down menu, or by a series of keyboard shortcuts. However first we must know what view modes (a.k.a. draw types) we need to use for YS Flight. Principally we will be using the following three for 99.9% of all our work:
| View Mode | What it does |
|---|---|
| Textured |
This is where we can see the colors of the model plainly. The image of OWL's A345 above was taken in the textured view mode |
| Solid | This is where we can look at the shading of a model so that it will not have odd bright or dark spots when we fly in YSF. |
| Wireframe | This is very useful when trying to see through the model, or select something that is completely enclosed within another part of the aircraft, like the cockpit. |
To enter into the view modes, you can use the dropdown menu, however for a faster workflow you can use the following keyboard shortcuts:
| View Mode | Shortcut |
|---|---|
| Textured | Option/ Alt -> "z" |
| Solid | Toggle "z" |
| Wireframe | Toggle "z" |
Understanding YSFlight Models[]
Before we begin working on the model, we need to understand how the models work. Other flight simulators have Skins that wrap around a coarse model, but YSF is different. Here, the model we use is what we see in game. Therefore we have to actually alter the mesh to create different areas of color. Now YS Flight uses polygonal models. This is just a fancy name for models that use shapes for the side, rather than complex formulas. This means that we are actually going to be messing with the physical model, not a skin to go over it, when we modify models for YS Flight. This requires us to work a little harder, but in the long run we have more flexibility with the models.
While in blender, it is important to understand how things relate back to YS Flight so we don't confuse the export scripts and therefore find the final model looking different in YS Flight. As we come to certain things that are important for this knowledge of the model, we will discuss it.
Working With A Mesh - The Different Modes[]
Since the final model we see in YS Flight is what we are actually manipulating in blender, we need to be careful and understand how to interact with the model as to best achieve our goals. When we wish to select individual aspects of a model component, we have to be in Edit Mode. This allows us to directly manipulate a particular mesh (a component of the overall model, such as a fuselage or pair of wings). By default, we are in Object Mode. In this mode, we can manipulate the location, orientation, and scale of what blender calls objects, or individual components of a model (a.k.a. a mesh). Now, these two modes only affect the physical shape of a mesh. To edit the color, we have to paint the model in Vertex Paint Mode. In this mode we can select certain portions of the mesh and apply a color to it. This is then translated to what we see in YS Flight.
| Mode | Description |
|---|---|
| Object Mode |
Where we can alter the position, orientation, or scale of an object with respect to the other objects in the model or the workspace origin (To Be Discussed) |
| Edit Mode |
Where we can select a mesh and edit the physical shape of it. |
| Vertex Paint Mode | Where we can paint the model and apply colors to certain portions of the mesh. |
Blanking A Model[]
Like I mentioned earlier, a blank model, is a model that is typically white, but with details like landing gear, wings, and other parts, painted colors that will not change between different paint schemes. The process of making a blank can be complicated, but with the A345 OWL model, it is simple enough that the complexity is significantly reduced.
The process of blanking a model can be thought of as reversing the paint job the original modeler made. In effect we are trying to get the model to look like it had never been touched. To do this, we have to know how the paint jobs were originally applied.
Because we have to actually edit the mesh of the aircraft we are modeling, boundaries between colors have to be cut into the model to create different faces that can be painted. In order to reverse this, we have to strategically merge components together.
Identifying Places to Merge The Mesh
One of the two hardest things to do when blanking a model is to identify which faces need to/ can be merged. You want to look for a few criteria:
- There is a border between colors in the immediate area.
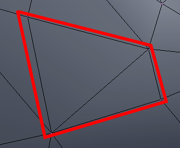
The face we wish to examine
- The mesh could have originally been flat (see pictures to the right)
- In the Solid view mode, there may be wierd shading issues in the area being examined.

Important Keyboard Shortcuts[]
| Shortcut | Resulting Action |
|---|---|
| "x" | Deletes everything selected. |
| "a" | Toggles between select all / deselect all |
| "w" | Opens the 'Specials' Menu |